I used the STE oil recommended by Puget. I live in Texas and had a trip to San Antonio, so it was no big deal to pick it up in San Marcos. They are great people.
I actually paid the same price per gallon that I would have been able to get at a feed store. Vets were no help at all. I even tried several medical supply companies, including medical supply reps. There's no avoiding the cost.
It took just over 9 gallons to fill the tank and radiator. I would think you could easily get away with 10 gallons.
My computer already runs pretty cool, and I haven't overclocked at all, but they say you have to leave an inch for thermal expansion of the oil (fill up to an inch of the bottom of the black rim) . I didn't do this. This morning after cooling all night, the was no noticeable change in the level. I ran it hard last night and the oil was up to 28 C. They also say you don't want it to touch the black rim for fear that it will wick oil out... Mine is touching and it hasn't wicked out yet... I feel like I'm tempting fate, but I'm keeping a very close eye on it.
Sunday, September 9, 2012
Saturday, September 8, 2012
Up and Running
It's running and hovering at about 27.5 C, so I'm happy.
The tank scratches VERY easily, but scratches on the inside are filled by the oil, making them disappear. Unfortunately, the outside scratches just as easy and there is no solution. They are delivered dirty, and must be cleaned. Even using an all cotton baby cloth with purified water there's swirling. Once scratched on the outside, it's toast.
I tracked the problem down to the material used by the makers of the tank. In tanks there are three main materials:
1) Plexiglass or Acrylic - Expensive, very good material, hard to scratch, but brittle
2) Polycarbonate - Cheaper, less likely to break, but easier to scratch
3) Polystyrene - The cheapest material, thin, easy to use in manufacturing, scratches like crazy.
So what is the eclipse tank made of? You guessed it, polystyrene. Thankfully, Puget has amazing customer service. They use this tank because their choices are limited. There can be no silicone seams, because they say the oil will leak through it. So they found this seamless tank to be their best option for the moment. To be fair, while completing the project took much longer and dealing with the scratching issue has been a huge pain, I'm still pleased with the final result.
I tested the tank for leaks first, then installed the bubble stones/tubes, cleaned/placed the rocks, submerged the system and booted right up.
Wednesday, August 29, 2012
Finished the Radiator and Hood Buttons
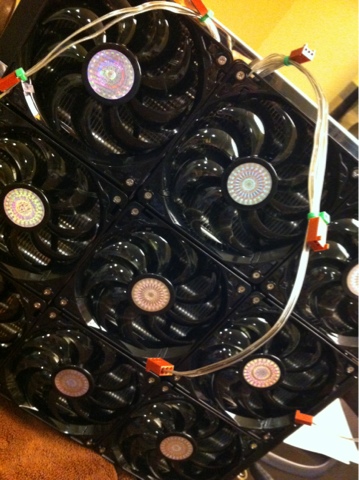
The radiator is good-to-go and I'm fairly pleased with how it turned out. As planned the fans are controlled (3 at a time in 3 rows) by a 3 channel controller that can handle 30 watts per channel. The on/off lights are visible from the front and left side, and the knobs/buttons are easy to control. I wish there was a better way to hide the controller, but a 5.25 bay is too big and they don't make a small, finished-looking 3.5 enclosure.
The buttons were difficult because one of them didn't come with a wiring diagram. I think I have it wired correctly. They both work. I'm sure of the wiring for the power button, but the reset button didn't work until I switched some wires. Power button is illuminated at all times with an amber LED to match the temp sensors. The reset button's LED flashes with the drives to show activity. The LED in the reset button doesn't glow as bright. I think the power leads were connected wrong, damaging the LED. I wasn't sure which was + and which was -... Still don't... But they work...
The buttons were difficult because one of them didn't come with a wiring diagram. I think I have it wired correctly. They both work. I'm sure of the wiring for the power button, but the reset button didn't work until I switched some wires. Power button is illuminated at all times with an amber LED to match the temp sensors. The reset button's LED flashes with the drives to show activity. The LED in the reset button doesn't glow as bright. I think the power leads were connected wrong, damaging the LED. I wasn't sure which was + and which was -... Still don't... But they work...
Tuesday, August 28, 2012
Avoid Scratching The Acylic
ORIGINALLY I POSTED THE BELOW, BUT I DON'T RECOMMEND THIS IN THE PUGET TANKS. IT WILL WORK FOR SCUFFS AND SCRATCHES THAT BUG YOU, BUT IT MAY BE BETTER TO BUY A NEW TANK AS IT LEAVES SMALL SWIRL MARKS AND CLOUDS THE PLASTIC. IT IS A GREAT IDEA TO REFURBISH A BACKUP TANK. IF THE TANK MAKER WOULD USE ACRYLIC, THIS WOULD LIKELY WORK
Building this thing and getting everything just how I wanted it has created a lot of smudges. Being that my original tank couldn't even arrive without a scratch left me VERY paranoid about making any attempt to clean this thing.
Looking into the care of acrylic tanks, I've found some warnings and suggestions:
1) Use Mr. Clean's Magic Eraser to clean it. Apparently, it is chemical free and acts like 3000 grit sandpaper. Click here to check out what folks in the aquarium world have said about this. Obviously, you don't want to trap more abrasive objects in the Magic Eraser that could do damage. They also recommend that you wet it with water. I'm not really sure how this works yet, but I will report back.
2) Don't use cleaning products that contain alcohol or ammonia. No further explanation was given. So what do you use? Just water? This would have to leave smudges and streaks...
I will report back.
Saturday, August 25, 2012
Please follow the blog
I hope this has been helpful to you in some way. While I'm not sure how google works, I'm pretty sure it would help move this blog up in search queries if there were some people following it.
So, if you want to make this blog more available to folks searching via google, yahoo, etc. please follow the blog.
Thanks!
So, if you want to make this blog more available to folks searching via google, yahoo, etc. please follow the blog.
Thanks!
Friday, August 24, 2012
Need the tank, a few more cables and I'm ready
Not sure about having the SSD's in the oil... Going to research it, but I've got everything else just about how I wanted it.
Wednesday, August 22, 2012
Progress
Did some wiring today. There seems to be plenty of room (maybe a little too much) in the front of the tank, but there is very little space, even for wires, behind the tank. An inch back there would make clean wiring a snap.

It would also be amazing if there was a hole just beneath the power supply on the motherboard tray an also just behind the power supply on the top, so power chords could be hidden en route to devices kept out of the oil.
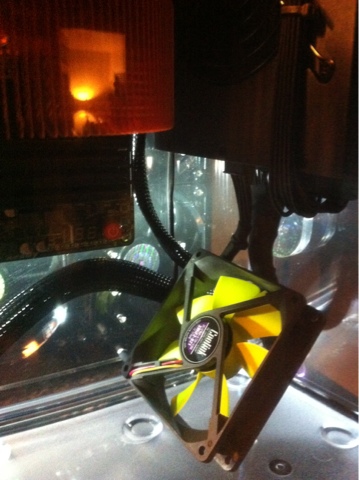

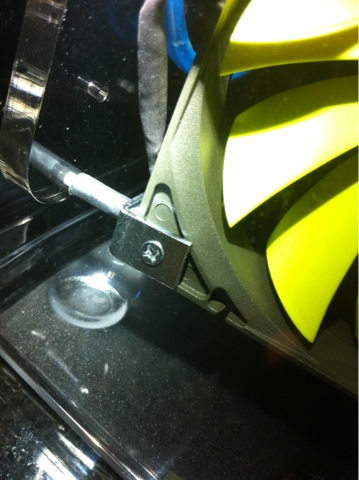
I also had to engineer a way to mount fans. I wish There were some threaded holes on the side brackets, 120 and 80 mm apart for fan mounting. I'm sure there is a better solution than the one I came up with.

Another little mod I did was the addition of a copper oil return that pulls the oil from the top, over the CPU.


Overall, I'm still very please. I need to know how to safely clean all the smudges off the system tray, for fear that I might damage some circuitry or the acrylic.
It would also be amazing if there was a hole just beneath the power supply on the motherboard tray an also just behind the power supply on the top, so power chords could be hidden en route to devices kept out of the oil.
I also had to engineer a way to mount fans. I wish There were some threaded holes on the side brackets, 120 and 80 mm apart for fan mounting. I'm sure there is a better solution than the one I came up with.
Another little mod I did was the addition of a copper oil return that pulls the oil from the top, over the CPU.
Overall, I'm still very please. I need to know how to safely clean all the smudges off the system tray, for fear that I might damage some circuitry or the acrylic.
Tuesday, August 21, 2012
Arrival
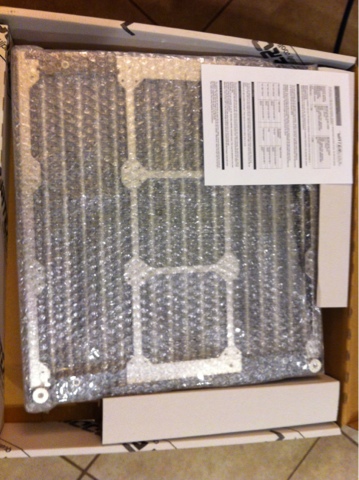
The kit arrived last night, and I got after it. The packaging was great, and UPS got it here without any obvious damage being done to the box.

It was well organized, and fairly easy to unbox, minus the peanuts.


There were no missing parts, and in no time I was ready to get rolling.
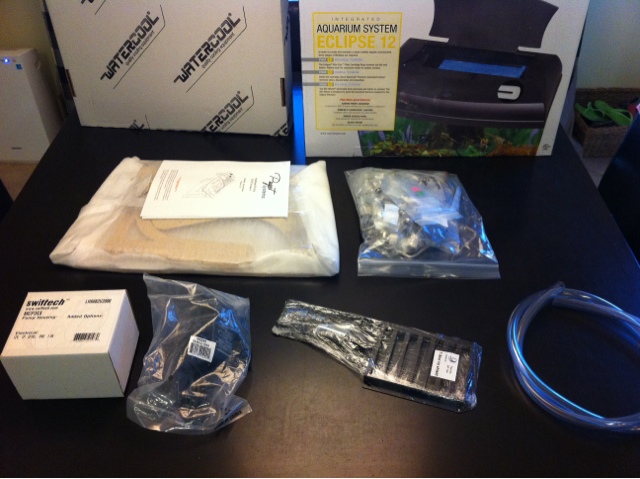
The acrylic parts were wrapped in a foam sheet and protected on one side by a film. The unprotected side appeared to be fine. To avoid scratches, I laid a towel out.

The directions were straight forward, and seemed to flow through logically ordered steps. The color-coded baggies were a blessing.


I was fearful about over-tightening, so I did everything finger-tight, meaning I considered screws set when I couldn't tighten them any more using just my fingers turning the screwdriver.
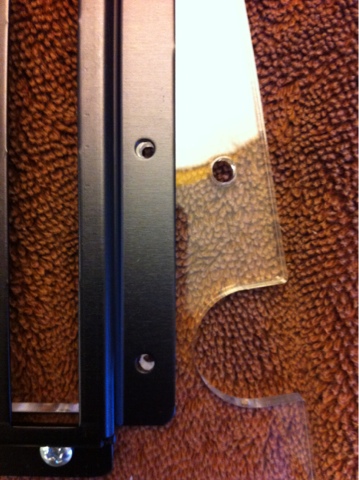
Some of the holes didn't line up with the non-Puget parts, but something tells me this is due to lax standards by their vendors rather than their laser-cut parts.
I did a little cleaning up of the cabling by heat shrinking the pump's wires. I wish I would have done this BEFORE installing it.

All the barbs and connectors were provided and seem to be of high quality.
Prepping the radiator was easy. I just removed a little residual protective film and installed the included feet.

Installing the fans wasn't difficult, but was time consuming. Be sure to plan this out it terms of flow direction, fan position, wiring, etc.
I decided the have the fans push air through the radiator.
Then, after dropping in the standoffs (hand-tight, no tool), on went the motherboard.

And then I got the tank out. I'm not happy with the tank. As opposed to the Puget acrylic, the Eclipse plastic feels thin and potentially brittle. What do I mean by potentially brittle? When you tap the Puget acrylic, it feels solid and heavy. Tap the tank plastic and it feels like it may be thin and light. It may also be easy to scratch, because it came out of the box with a scuff in the upper right corner, and long half-moon scratch on the inside, front-facing wall.
These flaws were easy to notice, but impossible to photograph. Amazingly, Puget has already resolved this issue for me by initiating an RMA. While I wait for the resolution to arrive, I will keep working on this:

I'm still excited, but anxious about the next tank.
It was well organized, and fairly easy to unbox, minus the peanuts.
There were no missing parts, and in no time I was ready to get rolling.
The acrylic parts were wrapped in a foam sheet and protected on one side by a film. The unprotected side appeared to be fine. To avoid scratches, I laid a towel out.
The directions were straight forward, and seemed to flow through logically ordered steps. The color-coded baggies were a blessing.
I was fearful about over-tightening, so I did everything finger-tight, meaning I considered screws set when I couldn't tighten them any more using just my fingers turning the screwdriver.
Some of the holes didn't line up with the non-Puget parts, but something tells me this is due to lax standards by their vendors rather than their laser-cut parts.
I did a little cleaning up of the cabling by heat shrinking the pump's wires. I wish I would have done this BEFORE installing it.
All the barbs and connectors were provided and seem to be of high quality.
Prepping the radiator was easy. I just removed a little residual protective film and installed the included feet.
Installing the fans wasn't difficult, but was time consuming. Be sure to plan this out it terms of flow direction, fan position, wiring, etc.
I decided the have the fans push air through the radiator.
Then, after dropping in the standoffs (hand-tight, no tool), on went the motherboard.
And then I got the tank out. I'm not happy with the tank. As opposed to the Puget acrylic, the Eclipse plastic feels thin and potentially brittle. What do I mean by potentially brittle? When you tap the Puget acrylic, it feels solid and heavy. Tap the tank plastic and it feels like it may be thin and light. It may also be easy to scratch, because it came out of the box with a scuff in the upper right corner, and long half-moon scratch on the inside, front-facing wall.
These flaws were easy to notice, but impossible to photograph. Amazingly, Puget has already resolved this issue for me by initiating an RMA. While I wait for the resolution to arrive, I will keep working on this:
I'm still excited, but anxious about the next tank.
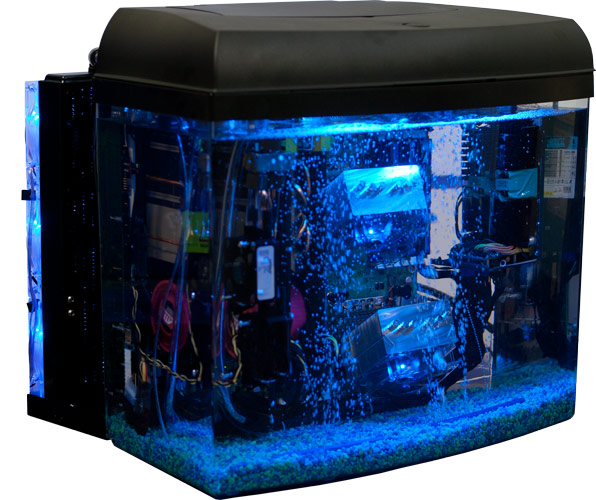
Bubbles, yes. Noisy pump, no.
Ok, so I want some bubbles... It's a fish tank, right? I had a tank as a kid and the pump was out of this world loud. One of the appealing things about the Aquarium PC to me was the relative silence. This pump operates submerged. There is a problem though. It makes LOTS AND LOTS of bubbles, and they are super tiny. So small, in fact, that they have a hard time surfacing in the thick oil. Not sure at this point... Pro's are underwater, quiet operation. Cons are small bubbles that cloud the oil... Well, I'm not sure about that last part. This was less than a gallon of oil, and in a 12 gallon tank with circulation, the clouding problem may not exist. Anyone know of a pump as quiet as this?
Monday, August 20, 2012
Radiator Fan Placement
I welcome data, suggestions, corrections, support and other feedback here (or on any other post for that matter)... But on this topic specifically, as I'm basing my approach on pure conjecture.
I noticed that Puget has their inlet at the top of the radiator. I'm guessing this is because it is smartest to let gravity help the pump, and allow the cooling of the oil (and it's natural tendency to sink when cooled) to help with circulation. What I mean is that there are a lot of bends in the radiator's tubing, and those bends create resistance. The pump has to work to overcome that resistance, and gravity may be more helpful in taking the fluid down, than cooling alone. The main point here is that it seems reasonable that reversing the flow would be extremely hard on the pump.
Knowing that the warmest fluid will be coming in at the top, and considering that I only have three knobs to control fan speed (each knob controlling three fans), my idea is to have the knobs control the fans in lateral rows.
111
222
333


Row "1" would have the highest RPM's when fans are needed. Rows "2" and "3" may not even be on. I'm hoping that cooling the warm fluid at the top will make life easier on the pump, even if only a little. Maybe it will make the cooling process more efficient, and decrease overall temps. Row "2" would have the second highest RPM's when needed and then row "3" would be kicked on if things get hot.
Ultimately though, I hope to have all fans running at even, silent speeds...
I noticed that Puget has their inlet at the top of the radiator. I'm guessing this is because it is smartest to let gravity help the pump, and allow the cooling of the oil (and it's natural tendency to sink when cooled) to help with circulation. What I mean is that there are a lot of bends in the radiator's tubing, and those bends create resistance. The pump has to work to overcome that resistance, and gravity may be more helpful in taking the fluid down, than cooling alone. The main point here is that it seems reasonable that reversing the flow would be extremely hard on the pump.
Knowing that the warmest fluid will be coming in at the top, and considering that I only have three knobs to control fan speed (each knob controlling three fans), my idea is to have the knobs control the fans in lateral rows.
111
222
333
Row "1" would have the highest RPM's when fans are needed. Rows "2" and "3" may not even be on. I'm hoping that cooling the warm fluid at the top will make life easier on the pump, even if only a little. Maybe it will make the cooling process more efficient, and decrease overall temps. Row "2" would have the second highest RPM's when needed and then row "3" would be kicked on if things get hot.
Ultimately though, I hope to have all fans running at even, silent speeds...
Sunday, August 19, 2012
PSU Change
Ok, so if I'd shopped a LITTLE BIT MORE, I would have known that there are 100% modular PSU's. So I opted for the Corsair 1200AX to eliminate some cabling. Another reason it might be a good idea: I just noticed Puget reccomends a 1000 watt PSU. It also looks like the fan in the 1200AX runs at all times.
Components and Testing
First the fans. I chose (wrongly, perhaps) Cooler Master SickleFlow 120mm 2000 RPM fans. They were my first choice due to the low dB-A spec of 19. They are 3-pin fans that can be found on the cheap. Puget sells fans with 4-Pin molex connectors that may be easier to wire in a series.
Next the power supply. I purchased a Corsair HX850, because I wanted to minimize wiring. Unfortunately not all of the cables are modular. The main power cables and two PCI-E cables are not removeable. I'm going to try and find a way to safely cut the PCI-E out if I can hide them. I wish I'd found a PSU where these were optional, if one exists. Also note that the cooling fan rarely turns on this model.
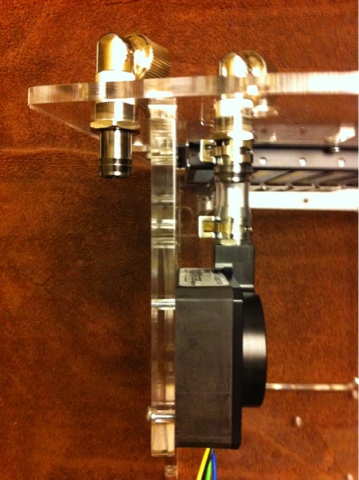
I alread had a Zalman CNPS9700LED, but didn't want to use the LED fan. So , I removed it. I plan to channel mineral oil from the radiator return right into the opening where the fan once was, which may take some engineering or fan. I may use a Coolink 120mm PWM Fan, hoocked into the CPU fan header, to force oil from the bottom of the tank up through the heat-sink.
I believe the Zalman might have some advantages in this type of build. First, it can be oriented to take advantage of the upward movement of the oil as it is heated. Secondly, I believe the all-copper design will help move the heat from the CPU to the surface area of the fins so the oil can sap it off.
Here are the components I'm using, so far:
- SanDisk Extreme SSD 240 GB SATA 6.0 Gb-s 2.5-Inch Solid State Drive x 2
- EVGA GeForce GT 430 1 GB DDR3 PCI Express 2.0
- Corsair 16GB(4x4) DDR3 1600MHz PC312800 240-Pin SDRAM Quad Channel Memory Kit
- Intel Core i5-3570K Quad-Core Processor 3.4 GHz 4 Core LGA 1155
- Gigabyte 1155 ATX Motherboard GA-Z77X-UD5H
- OCZ 30GB Nocti Series 3.0 Gb-s Slim mSATA SATA II Solid State Drive
 |
| Cooler Master SickleFlow 120mm with Three Pin Connections |
Next the power supply. I purchased a Corsair HX850, because I wanted to minimize wiring. Unfortunately not all of the cables are modular. The main power cables and two PCI-E cables are not removeable. I'm going to try and find a way to safely cut the PCI-E out if I can hide them. I wish I'd found a PSU where these were optional, if one exists. Also note that the cooling fan rarely turns on this model.
 |
| Too many cables |
I alread had a Zalman CNPS9700LED, but didn't want to use the LED fan. So , I removed it. I plan to channel mineral oil from the radiator return right into the opening where the fan once was, which may take some engineering or fan. I may use a Coolink 120mm PWM Fan, hoocked into the CPU fan header, to force oil from the bottom of the tank up through the heat-sink.
 |
| Flow will come from below |
 |
| Perhaps with added velocity from a fan |
I believe the Zalman might have some advantages in this type of build. First, it can be oriented to take advantage of the upward movement of the oil as it is heated. Secondly, I believe the all-copper design will help move the heat from the CPU to the surface area of the fins so the oil can sap it off.
 |
| CPU cooler can be oriented to take advantage of convection current |
- SanDisk Extreme SSD 240 GB SATA 6.0 Gb-s 2.5-Inch Solid State Drive x 2
- EVGA GeForce GT 430 1 GB DDR3 PCI Express 2.0
- Corsair 16GB(4x4) DDR3 1600MHz PC312800 240-Pin SDRAM Quad Channel Memory Kit
- Intel Core i5-3570K Quad-Core Processor 3.4 GHz 4 Core LGA 1155
- Gigabyte 1155 ATX Motherboard GA-Z77X-UD5H
- OCZ 30GB Nocti Series 3.0 Gb-s Slim mSATA SATA II Solid State Drive
Introduction
There aren't too many pictures or clear explanations of the V4 kit from Puget Systems out there yet. As a matter of fact, I believe many of the pictures they have on their own website are of the V3 version.
The best I could find on the V4 are in this youtube video:
And this drawing and picture from the Puget site. They appeared to me to represent all included components, minus the lid on the drawing (notice that the light appears to be included) and obviously not including the computer components on the picture:

Puget does have a pretty good history posted on their site, but not much on the V4.
My hope is that I can share my experience with clarity, using photos and videos, so you won't make my mistakes during your project.
So far I've already made a couple:
1. I though this would be inexpensive once I got passed the kit. Not the case, Add $200 for mineral oil if you can get it local. Even more if you have to pay freight. Then the cost of the fans for the radiator. Also, the components to get the fans working in a logical way (see mistakes 3 and 4). Plus, to get it looking like it's marketed, there are extra parts needed (see mistake 2).
2. I assumed that the V4 kit came with a light... All aquariums come with a light, right? Not this one. Read their site thoroughly and it's relatively clear, but if you look at the pictures of completed units, they all have a light. Small mistake, easy to correct. 3. I purchased nine 3-pin fans for the radiator, but there's really no easy way to connect them all together. I did see that Puget has a power adapter for the fans, and did purchase it. But I don't think I need all the fans running all the time or all at full speed. Well, that leads me to my next mistake.

4. I thought there would be a fan control solution on the market for controlling 9 fans on a radiator. Apparently, there's not much of a market for fan controllers with more than 8 channels. I think I have a solution. I purchased a 3 channel controller, and three 3-pin/3-way splitters.

I hope this helps you develop a clear assessment of the project before you dive in headlong, as I did.
Subscribe to:
Posts (Atom)